Are you ready to rock a retro look? Are you eager for an edgy ensemble that stands out from the standard styles of today? If so, then follow these steps and learn how to make your shirt look vintage! From clever bleaching techniques to careful distressing methods, this guide will have you looking like a fashionista in no time.
No matter what type of style statement you’re trying to make, achieving a unique, vintage vibe is easier than ever with just a few simple tips. Whether it’s an old t-shirt or a new one, we’ll show you how to create classic designs with contemporary flair. Plus, by following our instructions, you can customize any top for a totally individualized look.
Finally, if you want to add some throwback appeal to your wardrobe without breaking the bank or spending hours at the thrift store sorting through musty clothes, then keep reading! We’ve got all the tricks and techniques necessary for making any piece pop with personality—and giving off that timelessly fashionable feel.
Preparing The Shirt
Making a shirt look vintage is like taking a time machine back in time. With just the right preparation, you can transport yourself and your wardrobe to an era of nostalgia and timeless style.
To create a genuinely vintage look on any new shirt, there are certain steps that must be taken. First, you’ll want to find some fabric dye or an all-purpose colorant – these products will help give the fabric its aged appearance. Depending on the desired effect, consider using multiple colors for added depth and texture.
Once you’ve selected your supplies, it’s important to thoroughly prewash the garment before adding any dyes or stains. Pre Washing removes excess dirt and oils from the fabric which could affect how well the colorants adhere or spread across the material. After pre washing has been completed, test out small areas of the item with different types of treatments such as distressing techniques, bleach baths, etc., until you achieve desirable results.
Now that everything is prepared for dying or staining, it’s time to move onto washing the shirt…
Washing The Shirt
Washing the shirt is like a blank canvas, just waiting to be painted with vintage style. To achieve that aged look and make your plain garment look as if it has been worn for years, it’s important to pay special attention when washing the shirt. Here are some steps you can take to get started:
1) Hand-wash or use a delicate cycle in cold water – this helps preserve color and fabric integrity while getting rid of dirt buildup.
2) Use gentle detergent – harsh chemicals can strip away natural oils from cotton fibers which makes them less durable and prone to fading.
3) Hang dry instead of using a machine dryer – higher temperatures can cause shrinkage and over time will damage the fabric’s texture.
By following these simple guidelines, you’ll have taken an important step towards making a shirt look vintage without sacrificing its quality or comfortability. Washing gives us the perfect starting point for creating that lived-in feel we all crave; now, on to bleaching!
Bleaching The Shirt
Bleaching the shirt is an easy way to make it look vintage. You can use a store-bought bleaching kit or mix your own solution at home, depending on how much time you have and what kind of materials you have available. If you opt for the latter, make sure you take all necessary safety precautions when mixing chemicals!
Once your bleach mixture is ready, apply it directly onto parts of the black shirt that you’d like to lighten up. For example, if you want your shirt to look worn out and faded in places, concentrate the bleach on those areas instead of spreading it evenly across the whole garment. Be sure to keep track of which sections are already treated with bleach – this will help prevent any accidental over bleaching.
When applying bleach to a black shirt, always start by adding small amounts first before gradually increasing until you achieve the desired results. This process takes some practice and patience but don’t be afraid to experiment – as long as you stay within safe boundaries, there’s no need to worry about ruining your clothing! With these tips in mind, you’ll soon be able to create an eye-catching vintage piece from an ordinary black t-shirt. Now let’s move on to adding distressing details…
Adding Distressing Details
It’s ironic that you’d want to make a shirt look vintage – the only way to truly get an authentically aged style is by waiting decades! But if you’re not willing to wait, never fear – there are plenty of ways that you can create a weathered and worn-in look. One great method is adding distressing details.
Distressing your shirt doesn’t have to be difficult; all it takes is some fabric scissors and some imagination. Cut small holes around the neckline or armholes for a frayed, ripped effect. You could even snip away at sections of the material from various angles to add texture. Don’t hold back here – go wild with those scissors! If you don’t like what you ended up with, just sew it shut again later.
Adding distressed areas gives your shirt character; it looks as though time has taken its toll on the garment in all the right places. It’ll also give off a certain air of ‘I’m too cool for school’ vibes that will definitely resonate with anyone looking for belonging in their fashion choices! With this step complete, it’s now time for creating faded colors…
Creating Faded Colors
Let’s take our vintage look to the next level! Through creating faded colors, we’ll make that shirt appear like it has been around since way back when. To do this in 2021 style, let’s get started:
- Use a tie-dye method – It doesn’t need to be complicated – all you need is some bleach and a few rubber bands for a classic tie dye effect.
- Create ombré shading – This can be done with fabric dyes in two complementary shades or by gradually bleaching sections of your garments until they’re lighter than the rest.
- Add acid wash effects – You can easily achieve an acid wash effect with bleach and water or use special acid washes specifically created for denim fabrics if you prefer more professional results.
- Utilize sun fading – Leave your fabric out in direct sunlight over time to create subtle color variations across its surface area naturally.
With these techniques at hand, anyone can give their clothing piece an authentic vintage feel without spending too much time or money on it! Now onto adding patches and embellishments..
Adding Patches And Embellishments
A vintage look is a timeless style that can easily be achieved with the correct techniques. Crafting something to make it appear as though it has been passed down through generations of your family, or simply left in an attic for years, requires skill and finesse. To give clothing this effect, adding patches and embellishments is paramount.
Patches are perhaps one of the most iconic elements found on vintage clothing; they add a unique personal touch to any piece you own. Whether it’s a concert t-shirt from decades ago or a classic denim jacket, sewing on some vibrant patches will almost instantly create a nostalgic feel. If you don’t want to commit to stitching them onto fabric permanently, opt for iron-on versions instead – these come off just as quickly without leaving behind any damage!
Embellishments such as studs, buttons and sequins are also popular additions when attempting to capture a retro vibe. They can be used sparingly across areas like pockets or collars to complete the look. You might even choose to go big and bold by picking up statement pieces such as brooches or badges with bright colors and intricate designs – perfect for those who desire an outfit that stands out from the crowd!
These details create instant visual impact while showing off your personality: exactly what we all strive for when trying to achieve our desired fashion aesthetic. With their ability to transform old into new again, patches and embellishments provide the perfect finishing touches needed for creating timeless styles that never fall out of trend.
Adding Worn-In Effects
Adding worn-in effects to a shirt can create a vintage look that stands out. However, there’s more than one way to add this effect and make sure it looks natural. Let’s explore some of the best techniques for creating that authentic, lived-in feel:
- Distressing fabric: A distressed finish can give your garment an edgy appearance without looking too overworked or ‘too perfect’. You could use sandpaper on areas like the neckline, armholes, and hemline to get that subtle frayed look. Or you might want to try using bleach or dye for a unique tone.
- Adding wear marks: This technique requires experimentation as it involves adding intentional fading where you would naturally see it from regular wear over time – such as around pockets and seams. Try washing with stones or pumice in order to achieve this effect.
- Aging fabrics: To age fabrics, you need to consider how much texture you want the final product to have – when done correctly, aging fabric will make your item appear authentically aged instead of just plain faded. Some methods include grinding down edges with a stone wheel or adding indigo dyes and other treatments.
These are all great ways of making your shirt look vintage while maintaining its integrity. By following these tips, you’re sure to create something timeless that friends and family admire!
Creating Acid Wash Effects
Do you want to give your shirt a vintage look? Acid wash effects are the perfect way to do it! Whether you’re looking for something subtle or an extreme, tie-dye inspired style, there’s no doubt that adding acid wash will transform any top into something special.
But how can you create this effect yourself? It’s actually not as difficult as it sounds – with just a few supplies and some patience, anyone can achieve great results. All you need is fabric dye, salt and water. You’ll also want to make sure that you have rubber gloves on hand and wear clothes that won’t be ruined by splashes of dye.
Mix together the salt, water, and dye in a large bowl according to the instructions provided with the dye. Then start dipping sections of your shirt into the mixture until the desired coverage has been achieved. After allowing the garment to dry thoroughly, rinse out excess dye using cold water — congratulations, now your custom unique acid wash design is complete!
Giving old clothing new life doesn’t get much easier than this: creating an acid wash effect takes very little time but gives big results. So don’t wait: gather up those supplies and try it today! And when you’re ready for another challenge – why not try giving your item a torn look next?
Creating A Torn Look
Creating a torn look for your shirt can be like stitching together pieces of art. It’s an exciting way to make your clothing stand out and add some vintage flair.
Weaving different textures, tones, and styles into the fabric is key here. Frayed edges, patches, rips…all these elements will help give it that old-school vibe. Plus, you can even mix in other techniques like acid wash or screen printing if you want to take it up a notch.
The possibilities are endless when it comes to creating this unique style! Have fun experimenting until you get the perfect vintage aesthetic. And who knows? Maybe your new creation could become someone else’s favorite piece too – perhaps even sparking a trend! On to the next step: doing screen printing…
Ask For A Vintage Look From Your Screen Printer
Making a shirt look vintage is like taking a time machine to the past. You can get creative and add your own twists, just as if you were inventing something new for that era. Screen printing is one way to make it happen and Merchcult knows just how to create the look you desire. Oftentimes, screen printers can add a special touch to make a shirt’s print look vintage.
Screen printing involves pressing ink through mesh onto fabric or paper and transferring images from a stencil.This process can be altered to create a distressed print that makes the shirt appear to be vintage. Just find an artwork that speaks to you and create the pattern on the computer and ask your printer to make it look distressed in the printing process.
At Merchcult we are experienced and know exactly what to do when our customers ask for vintage looking tees. We use supplies such as screen frames, emulsion coating, screens, squeegee blades and plastisol inks. Once we have everything ready, we simply coat the screen frame with emulsion, let it dry then place your graphic face down on top of it. After exposing it to light so that only parts of your image are left behind, we rinse off any excess emulsion and voila – your designs are now ready for printing!
With this method, achieving a unique vintage is no trouble at all and the shirts come out looking amazing every time. So when life gives you lemons (or rather blank t-shirts!), reach out to Merchcult and watch us create shirts that are fashion statements dripping with nostalgia!
Using Fabric Dye
Achieving the perfect vintage look for a shirt can seem like an impossible feat! But with fabric dye, you’ll be able to create the desired effect in no time.
When it comes to giving a garment that timeless feel and achieving a unique design, few methods beat using fabric dye. It’s easy to use and provides excellent results – what could be better? You simply choose your favorite color of dye and apply it as per instructions on the package. Depending on how much coverage you’re looking for, one or more dyes can be used to achieve different effects – from subtle changes to bold statements.
If you’re feeling adventurous, why not explore creating a tie-dye effect by combining two or three colors together? This technique is sure to give any old shirt life again and make it stand out among its peers! With just a bit of creativity, you can take something plain and transform it into something truly special.
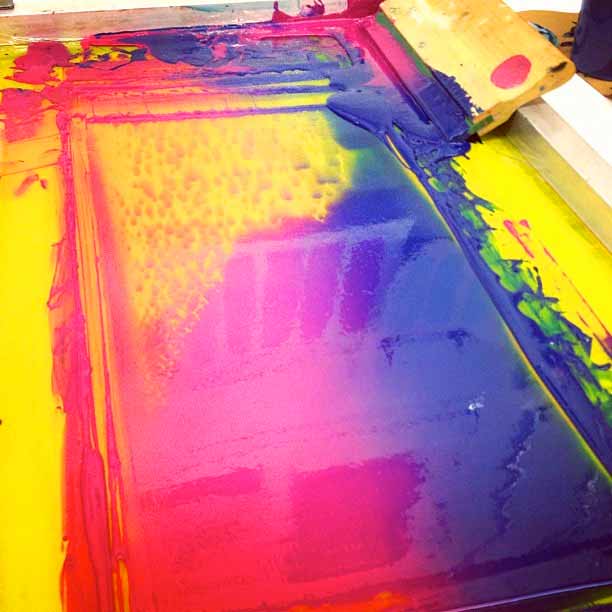
Creating A Tie-Dye Effect
Creating a tie-dye effect is the perfect way to give any shirt an instant vintage look. It’s so easy, and it can be done with just a few supplies you likely already have around your home! Whether you’re looking for something subtle or vibrant, there are plenty of tie-dye techniques out there that will help you achieve your desired outcome.
Let’s start by gathering the necessary materials: fabric dye, rubber bands, gloves (optional), soda ash fixer solution, plastic sheeting or a garbage bag, and of course some shirts! Once these items have been collected, it’s time to get started on making your unique designs. To make sure the colors don’t bleed together too much when dying fabric, use small rubber bands to create sections in which different colors will be applied. This ensures each color stays in its designated area during the dye process. For those who want brighter shades – dilute the dye with water before applying it to the garment.
When all the colors are applied correctly and everything looks great, place them into a bucket filled with warm water and let them sit overnight until they dry completely. Then rinse them off with cold water until no more excess dye runs from the fabric. Now add one cup of Soda Ash Fixer Solution per gallon of water used for soaking your garments and leave them submerged for about 30 minutes – this helps set the dyes permanently!
Once that step is finished, take out your creations and lay them flat on a piece of wax paper or hang them up outside to air dry naturally in direct sunlight. Voila! You now have stylish t-shirts with a totally vintage vibe – ready to show off in style!
Adding Fringe
Adding some fringes to a shirt can be the perfect way of giving it an instant vintage look. Imagine the gentle swaying of fabric as you walk, and how your friends will envy that boho chic style! It’s such an easy technique to give your clothing an instant transformation – all you need is some scissors and creativity.
Start by cutting thin strips along the edges of the shirt, making sure they are even in length and width. You may want to use pins or tape when measuring out lengths so that everything is consistent. The key here is to make sure each strip has at least one inch of uncut material attached so that it doesn’t fray too much when worn. If you’re feeling adventurous, why not add different colors for a fun look?
You’ll also want to secure each fringe with a few stitches on either end so that it stays in place and won’t come undone after a few wears. Be careful not to pull too tightly when sewing; if done correctly, this should help keep the shape of the shirt intact while still allowing movement from the added embellishments. With these simple steps, you’ve now given your wardrobe staple an extra dose of character and charm!
Now comes the time to take things up another notch by applying distressing wax onto the fringes. This will add texture and dimensionality while giving them an aged appearance. Let’s get started!
Applying A Distressing Wax
Are you looking to make your shirt look vintage? One of the most important steps is to apply a distressing wax. This will give it an aged, worn-in look that’ll really complete the transformation.
Distressing wax gives fabric a unique texture and appearance – it helps create creases and frayed edges which were otherwise difficult to achieve. It also adds color variation that comes with age and wear, so be sure to pick one that’s right for your project!
Applying distressing wax can take some practice but once you’ve gotten the hang of it, you’ll have yourself a piece of clothing fit for any stylish occasion. The key is to start slow and build up layers until you’re happy with the result. You don’t want to overdo it or else you risk ruining your garment entirely!
Now that we’ve taken care of this step in making a shirt look vintage, let’s move on to the finishing touches for completing the perfect retro look.
Finishing Touches For A Vintage Look
When it comes to making a shirt look vintage, there’s more than just applying distressing wax. Adding finishing touches can make all the difference in taking an outfit from modern to retro-chic. In fact, according to recent research by fashion experts, up-cycled clothing has grown into a billion dollar industry as people seek out items with special character and history.
If you’re looking for ways to give your shirt that classic vintage feel, here are some tips! Start off by adding patches or embellishments like studs, buttons or embroidery. These details add texture and dimension which will instantly elevate the style of any basic t-shirt. For a truly timeless look, choose patch designs that feature traditional symbols such as roses or skulls – these will never go out of fashion!
To complete the vintage effect, use fabric dyes specifically designed for clothes. Apply them directly onto areas where natural wear would occur – seams and cuffs are great places to start. This technique is especially effective when combined with contrasting colors; try pairing pastel hues together for a unique color palette. Applying subtle effects like this gives new life to pre-loved pieces while preserving their original charm.
By following these steps you’ll be well on your way to creating one-of-a-kind garments that stand out from the crowd and showcase your individual style! With each piece crafted thoughtfully and attentively, expressing who you are becomes easier than ever before.
Frequently Asked Questions About How To Make A Shirt Look Vintage
What Tools Do I Need To Make A Shirt Look Vintage?
Creating a vintage look in your wardrobe is like taking a time machine back to the past. It requires an eye for detail and some special tools. You know you’ve got what it takes – so let’s get started on answering our question: What do I need to make a shirt look vintage?
To create something truly timeless, start with quality fabric that will last through multiple washes. A pair of scissors and tailor’s chalk are essential for cutting and marking out any frayed edges or distressed holes you might want to add to your design. Needles, thread, buttons, and pins are also handy for repairing or replacing old detailing or adding new ones such as ruffles or pleats.
Most importantly though, don’t forget about accessories! Small touches can really bring your look together – think patches, badges, chains, lacing… all little things that will elevate your style from just okay to unique and personalized. If these pieces already have their own story then even better; they’ll add character and charm which will take your outfit back decades into the past!
With just a few items you can give any item of clothing that classic vintage feel – so go ahead and experiment until you’ve crafted a look that reflects who you truly are!
Are There Any Safety Precautions I Should Take When Creating A Vintage Look?
When you’re creating something special, the last thing you want to think about is safety. But it’s important to remember that some vintage looks involve chemicals and tools with sharp edges – so when it comes to making a shirt look vintage, there are definitely certain precautions you should take!
First of all, make sure any materials you’re using are safe for your skin – wear gloves if necessary. And even if you’re just using bleach or dye on fabric, protect yourself from contact with these substances by wearing protective glasses and clothes. Secondly, use appropriate tools such as scissors and needles safely; be aware of the risks associated with cutting fabrics and stitching them together.
Finally, don’t forget the most important safety rule: keep an eye out for potential hazards in your workspace. Make sure no pets or small children can get close enough to touch your supplies or tools while working – nobody wants accidents happening! Creating a truly unique piece isn’t worth risking anyone’s wellbeing over. With these simple tips in mind, let your creativity flow as you transform any clothing item into a one-of-a-kind statement piece that will stand the test of time!
Can I Use Vintage Fabric To Make A Shirt Look Vintage?
It’s easy to feel overwhelmed when embarking on a vintage-inspired project. The thought of sourcing the perfect fabric, finding the right color and pattern, and achieving an authentically aged look can be daunting. But don’t worry – with some creativity and resourcefulness you’ll soon have a shirt that looks like it could have been worn in decades past!
The key to creating a truly vintage aesthetic lies in using fabrics that are actually vintage or at least resemble them as closely as possible. For example, cotton is often used for clothing from the 1940s through 1970s, while rayon was popular during the 1920s and 1930s. By choosing fabrics made before 1975 (the year when most synthetic fibers were introduced) you’re sure to get a more authentic look. Additionally, try seeking out pre-loved items such as old neckties – these can be upcycled into unique patchwork designs that add instant character to any garment.
Taking care not to overcomplicate things is essential; too much detail can take away from the retro feel you’re trying to achieve. As Mark Twain once said: “Simplicity is the soul of efficiency.” Keep your design simple yet interesting by making use of accessories like buttons or lace trims for added texture and flair. This way, you’ll create something special without having to go overboard – exactly what we all need for our timeless fashion statements!
Are There Any Tips For Making The Shirt Look Naturally Worn-In?
Making a vintage-looking shirt is like taking a journey back in time. You can start by selecting fabric that has been washed several times to give it an aged, worn look. To add some texture and depth, use fabrics of different colors or patterns that have faded slightly over the years. For a truly authentic, naturally worn-in vibe, there are a few tips you should keep in mind.
First, choose stitching techniques such as herringbone stitch which will help create fraying around the edges for an edgy feel. Be sure to apply these stitches on both sides of your project so they stay visible after multiple washes. Additionally, machine washing and drying with tumble dryer sheets adds fading effects while still keeping the color intact. Lastly, consider adding rips or distressing marks here and there using scissors or sandpaper – this will bring out that retro charm!
Creating something unique doesn’t have to be difficult; just take time to experiment with various techniques until you find what works best for your style. With patience and practice anyone can make their own customized shirt that looks authentically vintage without breaking the bank – all you need is a bit of creativity!
Is It Possible To Create A Vintage Look Without Using Any Bleaching Or Acid Wash Effects?
Creating a vintage look for your shirt doesn’t have to mean using harsh bleach or acid wash effects. In fact, recent studies show that one in four people prefer the natural worn-in look of their clothes over anything else. If you’re looking to achieve this style without any chemicals involved, there are few key tips and tricks which can help you on your way.
Firstly, it’s important to focus on selecting the right fabric when creating your vintage look. Natural fibers like cotton and linen tend to age better than synthetic materials as they hold dye more effectively, giving off a softer hue overtime with regular washes – something polyester just won’t do! Additionally, choosing lighter colors is also beneficial for developing an aged aesthetic; light blues and beiges will offer a fantastic sun bleached effect when exposed to the elements.
Secondly, it’s all about how you wear and care for your shirt. Washing them less frequently will ensure the color remains consistent throughout their lifespan while not having too much structure around the neckline can give off a relaxed feel. To enhance this further try adding some subtle fraying along hems and sleeves as well as wearing it open instead of buttoned up – these small touches can add up to create that unique distressed appearance:
- Choose natural fabrics such as cotton or linen
- Opt for lighter shades such as blue or beige
- Wash less often but iron regularly
- Create frayed edges at cuffs & collars
- Wear open instead of buttoned up
With these simple yet effective techniques you’ll soon find yourself rocking that perfect vintage vibe without needing any fancy washing methods! It may take some time before reaching full desired results however by taking a little extra effort into each step along the way you’ll soon be able to make old new again.
To conclude, if you want to give your shirt a vintage look, there are many different techniques and tools that you can use. With the right materials and equipment, such as scissors, fabric dye or bleach, and an iron, it’s possible to create a beautiful piece of clothing that looks like it has been around for decades. Safety is also important when creating this look; make sure to wear gloves and pay close attention to instructions when using any chemicals.
The best part about making a vintage-looking garment is that no two pieces ever come out exactly alike! You can have fun experimenting with various dyes and fabrics to find the perfect combination that makes your shirt stand out from the crowd. Plus, thanks to modern textile treatments and finishes, you don’t even need to rely on acid washes or bleaching agents anymore – so you can achieve an authentic vintage look without risking damage or discoloration. It really is amazing how easily you can transform something ordinary into something extraordinary with just a few simple steps!
In short, giving your wardrobe an instant update by adding some stylishly worn-in effects couldn’t be easier – it’s almost too easy! With all these tips in mind, why not try creating a one-of-a-kind masterpiece today? The possibilities are truly endless – every single time you do it will be like walking through a magical door into yesteryear!